Stop the Drip: A Comprehensive Guide to Faucet Leaking Hose Repair
A leaky faucet is more than just an annoyance; it’s a drain on your wallet and a waste of precious water resources. One of the most common causes of a leaky faucet is a problem with the hose connecting it to the water supply. Understanding faucet leaking hose repair is crucial for any homeowner looking to tackle minor plumbing issues without calling a professional. This comprehensive guide will walk you through the process, from diagnosing the problem to implementing effective solutions. We’ll cover everything from identifying the type of leak to selecting the right tools and materials, ensuring you can confidently address a faucet leaking hose repair.
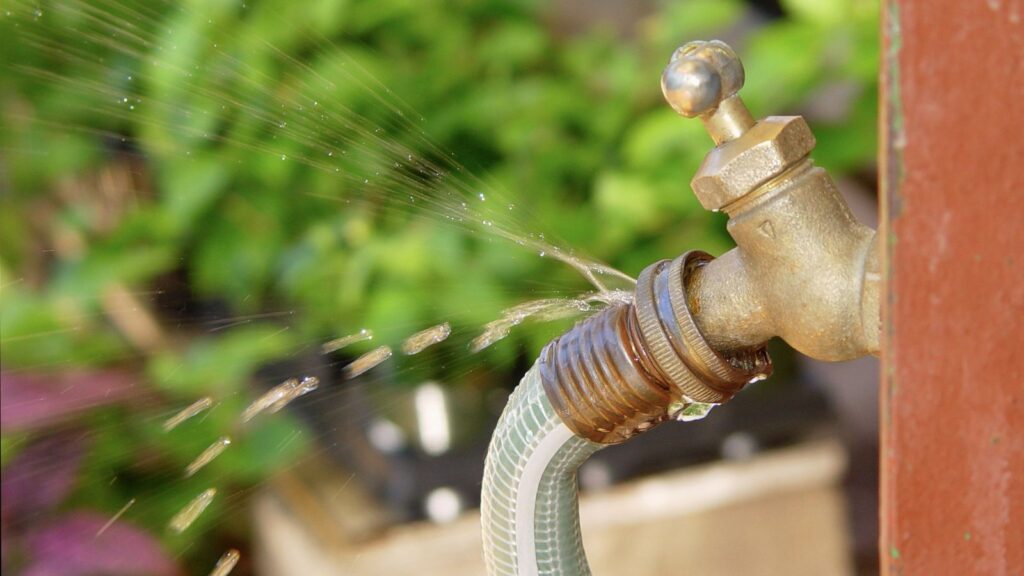
Understanding the Anatomy of a Faucet Hose
Before diving into the repair process, it’s essential to understand the different components of a faucet hose. Typically, a faucet hose consists of:
- The Hose Itself: Usually made of braided stainless steel or flexible polymer, the hose carries water from the shut-off valve to the faucet.
- Connectors: These are the threaded ends that attach the hose to the shut-off valve and the faucet tailpiece.
- Washers/O-rings: Located inside the connectors, these provide a watertight seal.
Identifying the Source of the Leak
The first step in faucet leaking hose repair is pinpointing the exact location of the leak. Common areas where leaks occur include:
- At the Connector: Leaks here often indicate a loose connection or a worn-out washer.
- Along the Hose: This could signal damage to the hose itself, such as a crack or puncture.
- Where the Hose Meets the Faucet Body: Issues here might involve the faucet’s internal components, but it’s worth checking the hose connection first.
Carefully inspect the entire hose and its connections for any signs of water. Use a dry cloth to wipe down the area and observe where the water reappears. This will help you accurately identify the source of the leak and determine the necessary repair.
Tools and Materials You’ll Need
Having the right tools and materials on hand will make the faucet leaking hose repair process much smoother. Here’s a checklist:
- Adjustable Wrench: For tightening and loosening connections.
- Basin Wrench (Optional): Useful for reaching hard-to-access faucet connections.
- New Faucet Hose (If Replacing): Ensure it’s the correct size and type for your faucet.
- New Washers/O-rings: If the leak is due to worn seals.
- Plumber’s Tape (Teflon Tape): For sealing threaded connections.
- Bucket and Towels: To catch water and clean up spills.
- Screwdriver: Depending on your faucet model, you might need a screwdriver to access the hose connections.
Step-by-Step Guide to Faucet Leaking Hose Repair
Follow these steps to effectively repair a faucet leaking hose:
Step 1: Shut Off the Water Supply
Before starting any plumbing work, it’s crucial to shut off the water supply to the faucet. Locate the shut-off valves under the sink and turn them clockwise until they are completely closed. If you can’t find individual shut-off valves, you may need to turn off the main water supply to your house.
Step 2: Disconnect the Old Hose
Place a bucket under the faucet to catch any remaining water. Use an adjustable wrench to loosen the connections at both ends of the hose. Be careful not to damage the faucet tailpiece or the shut-off valve. Once the connections are loose, carefully disconnect the hose.
Step 3: Inspect the Hose and Connections
Examine the old hose for any signs of damage, such as cracks, punctures, or corrosion. Check the washers or O-rings inside the connectors for wear and tear. If the hose is damaged, it’s best to replace it entirely. If the washers are worn, replace them with new ones.
Step 4: Apply Plumber’s Tape (If Necessary)
If you’re reusing the existing connectors, clean the threads thoroughly and apply a few wraps of plumber’s tape clockwise around the threads. This will help create a watertight seal.
Step 5: Connect the New Hose or Reassemble the Old Hose
If you’re replacing the hose, connect the new hose to the shut-off valve and the faucet tailpiece. Make sure the connections are snug but not overtightened. If you’re reusing the old hose, reattach it to the connections, ensuring the washers are properly seated.
Step 6: Turn on the Water Supply and Check for Leaks
Slowly turn on the water supply to the faucet and carefully observe the connections for any leaks. If you see any leaks, tighten the connections slightly. If the leaks persist, you may need to disassemble the connections and reapply plumber’s tape or replace the washers.
Troubleshooting Common Issues
Even with careful execution, you might encounter some challenges during faucet leaking hose repair. Here are some common issues and their solutions:
- Tight Connections Still Leak: This could indicate damaged threads on the connector or faucet tailpiece. Consider replacing the connector or the entire faucet.
- Hose Kinks Easily: Use a hose with a flexible design or install a hose support to prevent kinking.
- Difficulty Reaching Connections: A basin wrench can be invaluable for accessing tight spaces under the sink.
When to Call a Professional Plumber
While many faucet leaking hose repair jobs are manageable for homeowners, there are situations where calling a professional plumber is the best course of action. Consider seeking professional help if:
- You’re uncomfortable working with plumbing.
- You can’t identify the source of the leak.
- The leak is related to the faucet’s internal components.
- You encounter significant corrosion or damage to the plumbing.
Attempting to fix a complex plumbing issue without the necessary knowledge and experience can lead to further damage and costly repairs. [See also: Diagnosing Common Faucet Problems] Knowing when to call a professional can save you time, money, and frustration in the long run.
Preventative Maintenance for Faucet Hoses
Preventing leaks is always better than having to repair them. Here are some tips for maintaining your faucet hoses and preventing future problems:
- Regularly Inspect Hoses: Check for any signs of wear, corrosion, or damage.
- Replace Hoses Periodically: Faucet hoses have a limited lifespan. Replace them every few years, even if they don’t show any signs of problems.
- Avoid Overtightening Connections: Overtightening can damage the connectors and washers, leading to leaks.
- Use Quality Hoses: Invest in durable, high-quality hoses that are less prone to leaks and damage.
Choosing the Right Replacement Hose
If you determine that you need to replace your faucet hose, it’s important to choose the right one. Consider the following factors:
- Size and Length: Ensure the new hose is the correct size and length for your faucet and plumbing setup.
- Material: Choose between braided stainless steel and flexible polymer hoses. Stainless steel hoses are more durable but can be less flexible.
- Connection Type: Match the connection type to your faucet and shut-off valve. Common connection types include compression, threaded, and push-fit.
- Certifications: Look for hoses that are certified by reputable organizations, such as NSF International, to ensure they meet safety and performance standards.
By carefully selecting the right replacement hose, you can ensure a long-lasting and leak-free repair.
The Environmental Impact of Leaky Faucets
It’s also important to consider the environmental impact of leaky faucets. Even a small drip can waste a significant amount of water over time. According to the EPA, household leaks can waste nearly 1 trillion gallons of water annually nationwide. Addressing a faucet leaking hose promptly not only saves you money but also helps conserve water resources and protect the environment.
Conclusion
Faucet leaking hose repair is a common plumbing issue that homeowners can often tackle themselves with the right tools, knowledge, and a bit of patience. By following the steps outlined in this guide, you can diagnose the problem, implement effective solutions, and prevent future leaks. Remember to prioritize safety by shutting off the water supply and seeking professional help when needed. Addressing a faucet leaking hose is a win-win: it saves you money on your water bill and helps conserve this precious resource. Don’t let that drip continue; take control and fix that faucet leaking hose today! [See also: Water Conservation Tips for Your Home] By understanding the anatomy of your faucet, identifying leaks early, and performing regular maintenance, you can keep your plumbing system in top shape and avoid costly repairs down the road. Addressing a faucet leaking hose repair also contributes to sustainability by minimizing water waste. So, grab your tools, follow this guide, and become a plumbing pro in your own home! Remember, even a small faucet leaking hose can lead to bigger problems if ignored. Taking the time to learn about faucet leaking hose repair is an investment in your home and the environment. Therefore, take the initiative to address that faucet leaking hose and enjoy the peace of mind that comes with a properly functioning plumbing system. A simple faucet leaking hose repair can make a big difference in your home’s efficiency and your wallet. Finally, mastering faucet leaking hose repair empowers you to be a more self-sufficient homeowner. Addressing a faucet leaking hose saves water and money. Don’t delay that faucet leaking hose repair. Learn faucet leaking hose repair today!
