Troubleshooting a Leaky Kitchen Upper Flex Hose on Tap: A Comprehensive Guide
Discovering a leak in your kitchen, especially from the kitchen upper flex hose on tap, can be a frustrating experience. Not only does it waste water, but it can also lead to potential water damage if left unattended. This comprehensive guide will walk you through the steps to identify the source of the leak, understand the common causes, and provide practical solutions to fix a kitchen upper flex hose on tap leaking. Whether you’re a seasoned DIY enthusiast or a complete novice, this article aims to equip you with the knowledge to tackle this common household problem effectively.
Understanding the Anatomy of Your Kitchen Tap
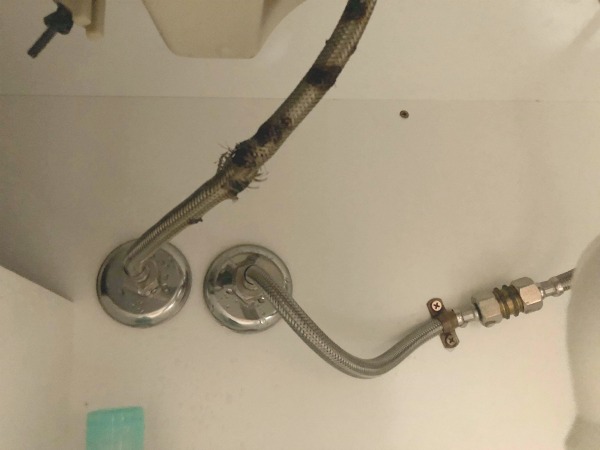
Before diving into the troubleshooting process, it’s crucial to understand the different components of your kitchen tap. Typically, a kitchen tap consists of the spout, handle(s), valve(s), and the flexible hoses that connect it to the water supply. The kitchen upper flex hose is the flexible pipe that carries water from the main supply lines to the tap itself. These hoses are often made of braided stainless steel or reinforced rubber, designed to withstand water pressure and temperature fluctuations. However, over time, they can deteriorate and become prone to leaks.
Identifying the Source of the Leak
The first step in addressing a kitchen upper flex hose on tap leaking is to pinpoint the exact location of the leak. This may seem obvious, but a careful inspection is necessary to avoid misdiagnosis. Start by visually inspecting the area around the tap and underneath the sink. Look for signs of water dripping, pooling, or discoloration. Dry the area thoroughly and then run the tap to see where the leak originates. Pay close attention to the connection points between the flex hose and the tap, as well as the hose itself. Common leak locations include:
- Hose Connections: Where the flex hose connects to the tap or the water supply valve.
- Hose Body: Along the length of the flex hose, indicating a crack or rupture.
- Tap Body: If the leak appears to be coming from the tap itself, it might be related to internal components rather than the flex hose.
Common Causes of Leaks in Kitchen Upper Flex Hoses
Several factors can contribute to a kitchen upper flex hose on tap leaking. Understanding these causes can help you prevent future leaks and maintain your plumbing system effectively:
Wear and Tear
Over time, the materials used in flex hoses can degrade due to constant exposure to water, pressure, and temperature changes. This is a natural process and one of the most common reasons for leaks. Regular inspection and replacement of older hoses can prevent unexpected failures.
High Water Pressure
Excessive water pressure can put undue stress on the flex hoses and their connections, leading to leaks. If you suspect your water pressure is too high, consider installing a pressure regulator to protect your plumbing system.
Corrosion
Corrosion can weaken the flex hose material, especially if the water supply has high mineral content. Look for signs of rust or discoloration on the hose or its connections. Replacing the hose with a corrosion-resistant option can extend its lifespan.
Improper Installation
Incorrect installation, such as overtightening or using the wrong type of sealant, can damage the flex hose and cause leaks. Always follow the manufacturer’s instructions carefully when installing or replacing a flex hose.
Freezing Temperatures
In colder climates, freezing water inside the flex hose can cause it to expand and rupture. Insulating pipes and taking precautions during freezing weather can prevent this type of damage.
Step-by-Step Guide to Fixing a Leaky Kitchen Upper Flex Hose
Once you’ve identified the source and cause of the leak, you can proceed with the repair. Here’s a step-by-step guide to fixing a kitchen upper flex hose on tap leaking:
Step 1: Turn Off the Water Supply
Before starting any plumbing work, it’s crucial to turn off the water supply to the tap. Locate the shut-off valves under the sink and turn them clockwise until they are completely closed. If you don’t have individual shut-off valves, you may need to turn off the main water supply to your house.
Step 2: Gather Your Tools and Materials
You’ll need the following tools and materials for the repair:
- Adjustable wrench
- Basin wrench (for hard-to-reach connections)
- New flex hose (ensure it’s the correct size and type)
- Plumber’s tape (Teflon tape)
- Bucket and towels
Step 3: Disconnect the Old Flex Hose
Place a bucket under the connection to catch any remaining water. Use the adjustable wrench or basin wrench to loosen the nuts connecting the flex hose to the tap and the water supply valve. Be careful not to damage the connections. Once the nuts are loose, carefully disconnect the old flex hose.
Step 4: Clean the Connections
Inspect the threads on the tap and water supply valve for any debris or corrosion. Clean them thoroughly with a wire brush or cloth. This will ensure a tight seal with the new flex hose.
Step 5: Apply Plumber’s Tape
Wrap plumber’s tape (Teflon tape) around the threads of the tap and water supply valve in a clockwise direction. Apply several layers of tape to create a watertight seal.
Step 6: Install the New Flex Hose
Connect the new flex hose to the tap and the water supply valve. Tighten the nuts securely with the adjustable wrench or basin wrench. Be careful not to overtighten, as this can damage the connections.
Step 7: Turn On the Water Supply
Slowly turn on the water supply and check for leaks at the connections. If you see any leaks, tighten the nuts slightly or reapply plumber’s tape. Continue adjusting until the leaks are eliminated.
Step 8: Test the Tap
Run the tap to ensure that water flows properly and that there are no leaks from the tap body or the flex hose connections. Observe the area for several minutes to confirm that the repair is successful.
Preventive Measures to Avoid Future Leaks
To minimize the risk of future leaks in your kitchen upper flex hose on tap, consider the following preventive measures:
- Regular Inspections: Periodically inspect your flex hoses for signs of wear, corrosion, or leaks.
- Replace Old Hoses: Replace flex hoses every 5-7 years, even if they don’t show any signs of damage.
- Maintain Water Pressure: Ensure that your water pressure is within the recommended range to prevent undue stress on your plumbing system.
- Proper Installation: Always follow the manufacturer’s instructions carefully when installing or replacing flex hoses.
- Insulate Pipes: In colder climates, insulate pipes to prevent freezing and potential ruptures.
When to Call a Professional Plumber
While many leaks can be fixed with DIY methods, there are situations where it’s best to call a professional plumber. Consider seeking professional help if:
- You’re uncomfortable working with plumbing.
- You can’t identify the source of the leak.
- The leak is severe and causing significant water damage.
- You suspect that the leak is related to a more complex plumbing issue.
Conclusion
Dealing with a kitchen upper flex hose on tap leaking can be a manageable task with the right knowledge and tools. By understanding the anatomy of your kitchen tap, identifying the source of the leak, and following the step-by-step guide, you can effectively repair the problem and prevent future leaks. Remember to prioritize safety and take preventive measures to maintain your plumbing system. If you’re unsure about any aspect of the repair, don’t hesitate to consult a professional plumber. Addressing a kitchen upper flex hose on tap leaking promptly not only saves water and money but also protects your home from potential water damage. By following these guidelines, you can ensure a long-lasting and leak-free kitchen tap system. The importance of maintaining your kitchen upper flex hose cannot be overstated, as it directly impacts the efficiency and safety of your water supply. Don’t neglect regular checks and timely replacements to keep your kitchen running smoothly. Ignoring a kitchen upper flex hose on tap leaking can lead to bigger problems down the line, so stay vigilant and proactive in your home maintenance routine. Remember, a well-maintained kitchen upper flex hose on tap contributes significantly to the overall health and functionality of your kitchen. [See also: How to Replace a Kitchen Faucet] [See also: Common Plumbing Problems and Solutions] [See also: Choosing the Right Flex Hose for Your Kitchen Tap]
